Custom Visual Script Event 유닛 만들기
이벤트 유닛은 프로그램이 실행되는 진입점으로 OnStart, OnUpdate, OnButton과 같은 것들이 있다. 다른 비주얼 스크립트 그래프가 이벤트를 전송할 수 있도록 하려면 Event Sender 유닛을 생성해야 한다.
사용자 정의 비주얼 이벤트(custom visual event)를 생성하는 프로세스는 다음과 같다.
- custom event sender 유닛을 만든다.
- C#으로 custom event를 trigger하는 스크립트를 생성한다.
- custom event를 수신하는 스크립트를 생성한다.
Custom Event 유닛 만들기
빈 이벤트 유닛을 만들려면:
- 프로젝트에서 마우스 오른쪽 버튼을 클릭하고 Create > C# Script로 새로운 C# File을 생성한다. 리네임하여 이벤트 유닛 이름으로 변경한다(예, MyEventNode.cs).
- 다음 코드를 스크립트에 복사, 붙여넣하고 저장한다.
using Unity.VisualScripting;
using UnityEngine;
//Registering a string name for your custom event to hook it to an event. You can save this class in a separated file and add multiple events to it as public static strings.
public static class EventNames
{
public static string MyCustomEvent = "MyCustomEvent";
}
[UnitTitle("On my Custom Event")]//Custom EventUnit to receive the event. Adding On to the unit title as an event naming convention.
[UnitCategory("Events\\MyEvents")]//Setting the path to find the unit in the fuzzy finder in Events > My Events.
public class MyCustomEvent : EventUnit<int>
{
[DoNotSerialize]// No need to serialize ports.
public ValueOutput result { get; private set; }// The event output data to return when the event is triggered.
protected override bool register => true;
// Adding an EventHook with the name of the event to the list of visual scripting events.
public override EventHook GetHook(GraphReference reference)
{
return new EventHook(EventNames.MyCustomEvent);
}
protected override void Definition()
{
base.Definition();
// Setting the value on our port.
result = ValueOutput<int>(nameof(result));
}
// Setting the value on our port.
protected override void AssignArguments(Flow flow, int data)
{
flow.SetValue(result, data);
}
} - Edit > Project Settings을 선택한다.
Project Settings 창이 나타난다.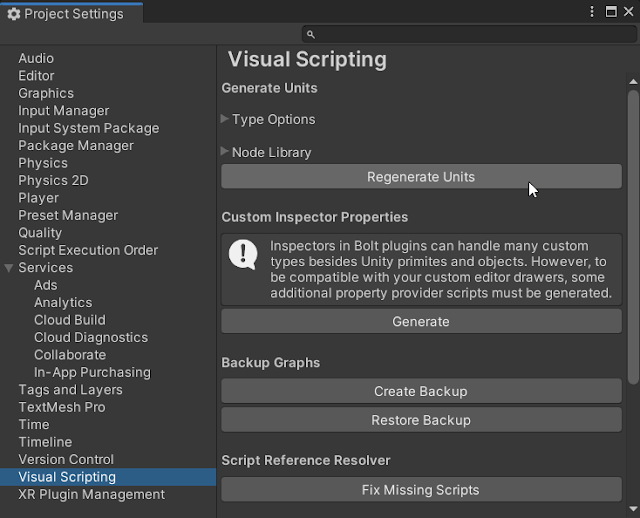
Project Setting - Project Settings 창에서 Visual Scripting을 선택하고 Regenerate Units를 클릭하여 퍼지 파인더에 새 유닛을 추가한다.
- 그래프에 새 이벤트 유닛을 추가하려면 스크립트 그래프의 백그라운드에 마우스 오른쪽 버튼을 클릭한다. 퍼지 파인더가 나타난다.
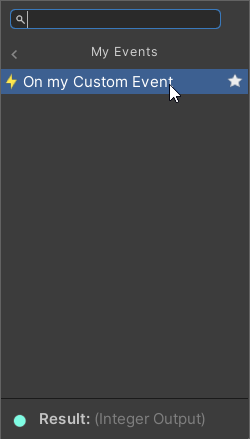
On My Custom Event - Events > My Events > On my custom Event를 선택한다. Script Graph 창이 나타난다. 그래프가 아래 처럼 보여지게 된다.
.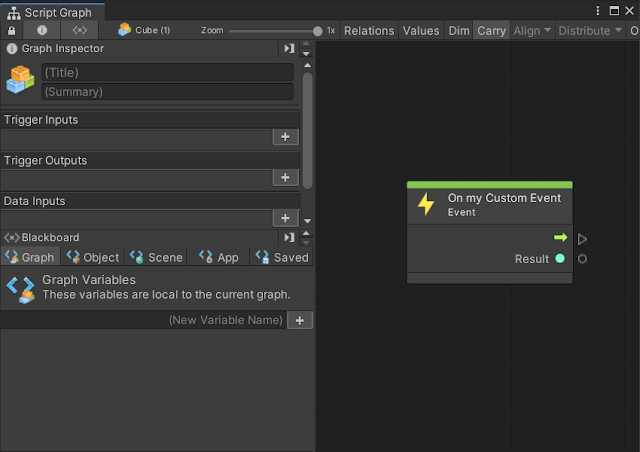
On My Custom Event Unit
예) 이벤트를 수신하였는지 확인하기 위해 event 값을 콘솔에 출력하도록 하는 Debug log 메시지를 출력한다.
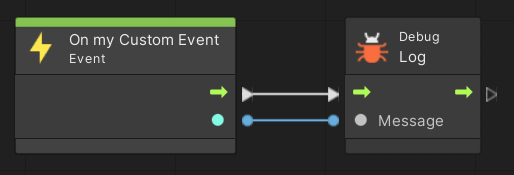 |
| On My Custom Event Unit |
Event Sender 유닛 만들기
사용자가 다른 그래프에서 이벤트 유닛을 트리거할 수 있도록 하려면 Event Sender 유닛을을 생성해야 한다. 이 유닛은 다른 그래프에서 이벤트를 방출하고 다른 그래프에 있는 이벤트에 값을 전달할 수 있다.
C# 스크립트에서 이벤트를 트리거할 수도 있다.
- 프로젝트에서 마우스 오른쪽 버튼을 클릭하고 Create > C# Script로 새로운 C# File 생성한다. 리네임하여 이벤트 유닛 이름으로 변경한다(예, SendMyEventNode.cs).
- 다음 코드를 스크립트에 복사, 붙여넣하고 저장한다.
using Unity.VisualScripting;
//Custom Unit to send the event
[UnitTitle("Send My custom Event")]
[UnitCategory("Events\\MyEvents")]//Setting the path to find the unit in the fuzzy finder in Events > My Events.
public class SendMyEvent : Unit
{
[DoNotSerialize]// Mandatory attribute, to make sure we don’t serialize data that should never be serialized.
[PortLabelHidden]// Hiding the port label as we normally hide the label for default Input and Output triggers.
public ControlInput inputTrigger { get; private set; }
[DoNotSerialize]
public ValueInput myValue;
[DoNotSerialize]
[PortLabelHidden]// Hiding the port label as we normally hide the label for default Input and Output triggers.
public ControlOutput outputTrigger { get; private set; }
protected override void Definition()
{
inputTrigger = ControlInput(nameof(inputTrigger), Trigger);
myValue = ValueInput<int>(nameof(myValue),1);
outputTrigger = ControlOutput(nameof(outputTrigger));
Succession(inputTrigger, outputTrigger);
}
//Sending the Event MyCustomEvent with the integer value from the ValueInput port myValueA.
private ControlOutput Trigger(Flow flow)
{
EventBus.Trigger(EventNames.MyCustomEvent, flow.GetValue<int>(myValue));
return outputTrigger;
}
} - Edit > Project Settings을 선택한다.
Project Settings 창이 나타난다.
Project Settings - Project Settings 창에서 Visual Scripting을 선택하고 Regenerate Units를 클릭하여 퍼지 파인더에 새 유닛을 추가한다.
- 그래프에 새로운 이벤트 유닛을 추가하려면 스크립트 그래프의 백그라운드에서 마우스 오른쪽 버튼을 클릭하고 Events > My Enents > Send My Custom Event를 선택한다.
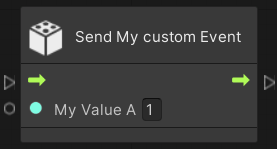 |
| Send My Custom Event Unit |
예) Space 바를 눌렀다가 놓을 때 SendMyCustomEvent를 보낸다.
 |
| Send My Custom Event Unit |
참고: Send My Custom Event 유닛과 On My CustomEvent 유닛을 테스트하려면 다음 단계를 모두 수행한다.
- custom evnet unit을 생성한다.
- event sender 유닛을 생성한다.
< Key up시 Event를 보내는 GameObject 추가 >
Key up시 Event를 보내기 위한 GameObject를 추가하려면;
- Hierarchy 윈도우에서 빈 GameObject를 새로 만들고 이름을 EventSender로 변경한다.
- Script Machine 컴포넌트를 추가한다.
- 스크립트 머신 컴포넌트에 새로운 스크립트 그래프를 추가한다.
- 그래프를 연다.
- 마우스 오른쪽 버튼을 클릭해서 퍼지 파인더를 연다.
- 퍼지 파인더에 "On Keyboard Input"를 검색하여 추가한다.
- 마우스 오른쪽 버튼을 클릭해서 퍼지 파인더를 연다.
- 퍼지 파인더에 "Send My custom Event"를 검색하여 추가한다.
- 두 노드를 연결한다.
예) 키보드 입력(keyboard input)과 연결되어져 있다.
 |
| Send My Custom Event Unit |
< 이벤트를 수신하고 코드를 실행하는 GameObject 추가 >
이벤트를 수신하고 코드를 실행할 GameObject를 추가하려면:
- Hierarchy 윈도우에서 빈 GameObject를 새로 만들고 이름을 EventReceiver로 변경한다.
- Script Machine 컴포넌트를 추가한다.
- 스크립트 머신 컴포넌트에 새로운 스크립트 그래프를 추가한다.
- 그래프를 연다.
- 마우스 오른쪽 버튼을 클릭해서 퍼지 파인더를 연다.
- 퍼지 파인더에 "On my Custom Event"를 검색하여 추가한다.
- 마우스 오른쪽 버튼을 클릭해서 퍼지 파인더를 연다.
- 퍼지 파인더에 "Debug Log"를 검색하여 추가한다.
- 두 노드를 연결하십시오.
예) 이벤트를 수신하고 이벤트 값을 콘솔에 출력한다.
 |
| On My Custom Event Unit |
한 번은 다음 단계를 완료해야 한다.
- setup을 테스트한다. 게임 스타트를 위해 "play button"을 누른다.
- 스페이스 바를 눌렀다 놓는다.
- Unity 콘솔에서 로그 메시지가 출력됐어야 한다.
코드에서 이벤트 트리거하기
C# 코드에서 이벤트 전송이 필요할 수도 있다. 다음 예는 컴포넌트 스크립트가 CodeTriggerCustomEvent를 호출하는 것으로 어떤 키가 눌렸을 때 이벤트를 트리거하는 클래스이다.
| using Unity.VisualScripting; using UnityEngine; public class CodeTriggerCustomEvent : MonoBehaviour { void Update() { if (Input.anyKeyDown) { //Triggering the previously created custom event MyCustomEvent with the integer value 2. EventBus.Trigger(EventNames.MyCustomEvent, 2); } } } |
씬(scene)의 어느 GameObject에 작성한 스크립트를 추가한다.
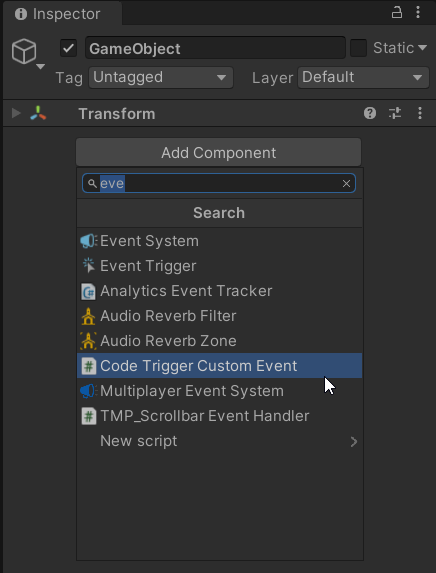 |
| Code Trigger Custom Event |
Play 버튼을 누르고 아무 키를 누른다. 그 이벤트는 앞서 작성한 이벤트가 있는 씬의 어느 스크립트 그래프내에서 트리거되어야 한다.
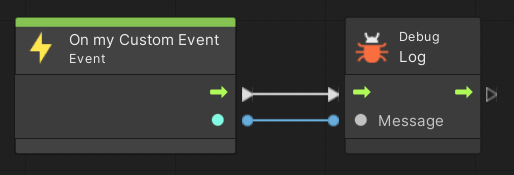 |
| On My Custom Event Unit |
C# 코드에서 이벤트 수신하기
C# 스크립트가 비주얼 스크립트에서 트리거된 이벤트를 수신하려면:
- 프로젝트에서 마우스 오른쪽 버튼을 클릭하고 Create > C# Script로 새로운 C# File 생성한다. 리네임하여 이벤트 유닛 이름으로 변경한다(예, EventReceiver.cs).
- 다음 코드를 스크립트에 복사, 붙여넣기, 저장한다.public class EventReceiver : MonoBehaviour
{
void Start()
{
EventBus.Register<int>(EventNames.MyCrazyCustomEvent, i =>
{
Debug.Log("RECEIVED " + i);
});
}
} - 현재 씬(scene)의 Hierarchy 창에 있는 GameObject를 선택한다.
- 인스펙터(Inspector)에서 Add Component후에 EventReceiver를 선택한다.
- 만약, 씬(scene)에 event sender가 있다면 Play 모드로 진행이 되고 event를 트리거 할 것이다.
- Unity 콘솔에 숫자(i) 뒤에 "REVERSED" 메시지가 출력되어야 한다.
<원문>
댓글
댓글 쓰기